The following backwater valve (BWV) maintenance suggestions based on general backwater valve (BWV) information. Your BWV may vary due to manufacturer differences and the size of the building sewer in which it is installed. It is recommended that the homeowner consider having a contractor maintain and clean this device on an annual basis. If you have any questions or are unsure about any of the suggestions to maintain your BWV, contact the MDC Utility Services Department at 860-278-7850 Ext. 3780 or [email protected].
- Always follow the manufacturer’s recommendations provided by the contractor for maintenance as your best guide.
- The BWV should be inspected and cleaned as needed twice per year.
- During the time that the BWV assembly is disassembled your drainage pit and or branch of sanitary plumbing will not have any backflow protection. For this reason, you should not disassemble the BWV during or immediately after heavy rains or during times of melting snow runoff.
- Sewer gas may be present, Be sure to use adequate ventilation.
- Make sure that there is no one using your plumbing facilities (washer, dishwasher, toilet, and etc.) when you are servicing your BWV. The stormwater / ground water or possible wastewater from the protected branch plumbing flows through the valve.
- Suggested Cleaning Materials
a. A bucket containing warm dish detergent or similar cleaning solution
b. Dish detergent (Non phosphate type that DOES NOT contain ammonia)
c. A long handled brush (a toilet cleaning brush)
d. Rags
e. Long rubber gloves
f. Eye protection
g. Suitable clothing (clothes and shoes, that you won’t mind getting dirty)
- Suggested disassembly procedure:
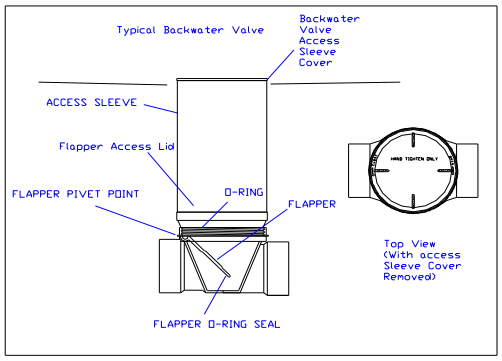
a. Locate and remove the cover from the backwater valve access sleeve, box, or pit.
b. Reach down into the access pit and, utilizing the extensions on the lid, SLOWLY turn the flapper ac-cess lid counter clockwise just enough to loosen it (1/4 turn). (IMPORTANT NOTE: Do not attempt to disassemble the backwater value during a rain event when the sewer system could be surcharged [or full] or water could come out around the loosened lid and flooding could occur.)
c. After verifying that water is NOT coming out from around the loosened lid, the lid can be removed.
d. Place the lid in the bucket of cleaning solution, be careful not to lose or damage the “O” ring, located on the inside perimeter of the flapper access lid.
e. Reach in and lift up on the backside of the flapper to remove it from the valve housing pivot point, it should come out easily as the weight of the flapper is all that holds it in the slotted area, don’t pry or otherwise try to force it out because the flapper or the valve casing could break. There is another, smaller “O” ring on the front of the flapper, being careful not to lose or damage the “O” ring, place the flapper into the bucket of cleaning solution.
f. Using the long-handled brush, that is wetted with cleaning solution, scrub the flat vertical surface area of the valve housing where the “O” ring on the flapper makes contact. Also clean out the slot of the flapper pivot point.
g. Clean the threads where the flapper access lid screws into the valve housing body and starting from the top, flush all surfaces with clean water. * (*If you use a water hose to rinsing or flushing the back-water valve, in order to avoid the possibility of contamination, DO NOT allow the hose to come in con-tact with the drain system.)
h. Clean the flapper and its “O” ring, (You can do this right in the bucket) being careful not to damage the “O” ring. If the ring has cracks or will not seat properly, replace it. Put the flapper back into the valve housing assembly pivot point.
i. Clean the flapper access cover and its “O” ring, examine this “O” ring for defects, just like previous item “h”, the flapper ring. If it is defective, replace it.
j. Make sure that the flapper is seated in the pivot point, carefully screw the cover down (clockwise) until firmly seated. Hand tighten only, DO NOT use a wrench.
k. Replace the backwater valve access sleeve cover.